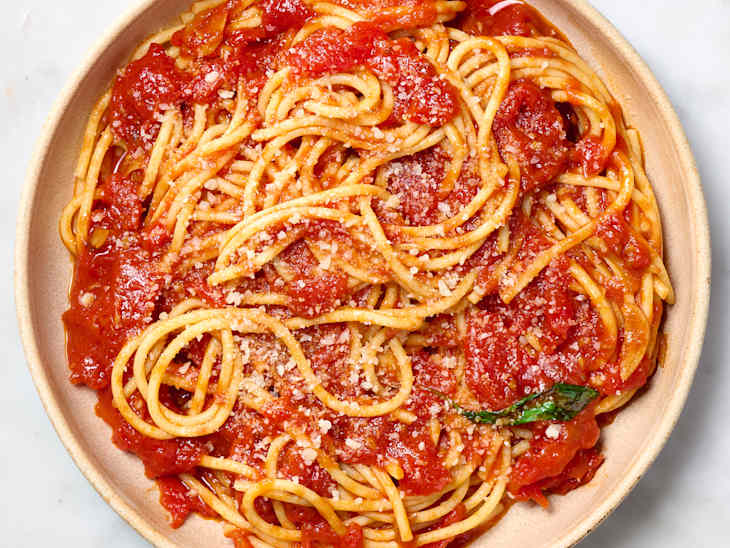
The New Jarred Pasta Sauce That Rivals the Sunday Sauce I Grew Up Eating (Itâs Better Than Raoâs!)

Itâs âthe best.â
READ MORE…

The Definitive Handbook for Creating Flawless Peach Crisp
Here’s an ideal recipe for peach crisp featuring fresh peaches, highlighted by a golden, crunchy crumble topping and a vanilla-infused filling! This traditional summer dessert recipe incorporates my advice for ripening and peeling peaches, along with make-ahead options, storage guidelines, and dietary alternatives.
Nothing compares to the delightful scent of a bubbling peach crisp in the oven, followed by snuggling up with a dish full of golden crumbles. I have a peach obsession, so as a cookbook author, I felt compelled to experiment when Alex and I found ourselves overwhelmed with juicy peaches from our local farmer’s market haul. This has become our favorite peach recipe: recently, we presented it to friends who returned for seconds—and even thirds!
I’ve tried this recipe countless times over the years, adjusting the sugar and perfecting the crumble-to-fruit ratio until I reached what I believe is peach crisp excellence! (Let me know if you concur.) The key is using flawlessly ripe peaches and ensuring that the filling is rich in both vanilla and lemon juice.
Ingredients for the ultimate peach crisp recipe
The most enjoyable aspect of preparing peach crisp? It’s quite forgiving. Unlike my mom’s fresh peach pie, there’s no tricky pastry crust to stress over. You simply mix, pour, sprinkle, and bake. I’ve found that even novice bakers can successfully make this recipe on their first attempt. Here are the ingredients you’ll require for a successful peach crisp recipe:
– Ripe fresh peaches – This is essential—don’t settle for under ripe. However, for this recipe, you can also use frozen or canned peaches if necessary.
– Granulated sugar – Just enough to highlight the natural sweetness.
– Cornstarch – My trick for avoiding a watery filling; use arrowroot starch as an alternative if needed.
– Lemon juice – Enhances the flavor (trust me! I’ve tested it without).
– Vanilla extract – The flavor booster that makes this crisp exceptional: peaches and vanilla create a perfect duo.
– Old-fashioned rolled oats – These provide the ideal texture.
– All-purpose flour – Or almond flour for a gluten-free option.
– Brown sugar – Introduces caramel undertones to the topping.
– Cinnamon – A classic complement to peaches.
– Cold butter – Vital for achieving that crispy texture.
My expert advice for ripening peaches
Throughout the years, I’ve perfected the technique of obtaining perfectly ripe peaches, even when they’re rock-hard in the store. There can be significant variability in ripeness when purchasing them: they might be incredibly firm or so juicy they’re nearly bruising. If they don’t yield when you gently squeeze them, they will need a few days to ripen. Here’s my method for ripening peaches:
I place the peaches in a paper bag alongside a banana. The banana emits ethylene gas, which aids in ripening the peaches uniformly over 1 to 4 days. I check them daily by gently pressing—when the flesh yields slightly under pressure, they’re ready for peach recipes.
Methods for peeling peaches
You can prepare peach crisp using skin-on peaches, but it does introduce an additional texture that some may not prefer. However, you shouldn’t attempt to peel peaches with a vegetable peeler: it damages the delicate fruit. Here’s my quick method for peeling peaches that I’ve learned from my mom in this peach pie recipe:
– Boil batches of peaches for 45 seconds each. Drop 3 peaches into a pot of boiling water, ensuring they’re fully submerged, and boil for 45 seconds.
– Transfer to ice water. Remove the peaches from the boiling water using a slotted spoon and place them in a bowl of ice water. Drop in the next batch and repeat.
– Remove the skin with your fingers. Once the peaches are cooled, use a sharp knife to poke the skin of the peach, then peel it off in large sections with your fingers.
Diet swaps I’ve tried
I’ve explored different dietary modifications to adapt this recipe for various needs:
– Gluten-Free: I replace all-purpose flour with almond flour. It creates an even crunchier topping that I sometimes prefer.
– Vegan: I utilize vegan butter or refined coconut oil as substitutes for regular butter. Vegan butter yields the crispiest results, while coconut oil produces a slightly softer (but still delectable) topping.
Storing leftovers
If you have a large dish of peach crisp and wish to save it, this dessert keeps well at room temperature, in the refrigerator, or frozen.
– It can remain uncovered at room temperature for 1 day. The topping retains its crispiness with this method.
– Refrigerate for up to 3 days. It holds up fairly well in the fridge and tastes even better when reheated.
– Freeze for up to 3 months. You can freeze peach crisp for as long as 3 months in a sealed container. Reheat in a 350-degree oven until bubbly and the topping is crisp.
Dietary notes
This peach crisp recipe is vegetarian. For gluten-free and

Peach and Blueberry Crisp Dessert Recipe
**Frozen and Canned Fruit: A Guide to Usage and Enhancements**
When seeking to savor fruit throughout the year, frozen and canned varieties offer a practical and adaptable option. Whether you’re preparing a dessert or a savory meal, these fruits can be just as tasty as their fresh counterparts, with a few tweaks.
**Using Frozen and Canned Peaches**
Frozen peaches are an excellent selection for recipes, as they do not need defrosting prior to use. However, they may occasionally be more tart than fresh peaches. To counter this, think about adding ½ cup of sugar to your filling. For canned peaches, choose those without added sugar, or include ¼ cup of sugar in the filling to reach the desired sweetness.
**Incorporating Frozen Blueberries**
Frozen blueberries are just as simple to use, needing no thawing. They can be a rapid and delightful enhancement to any recipe, preserving their taste and consistency.
**Efficient Peeling Techniques for Peaches**
Removing the skin from peaches can be effortless with the proper method. Immerse them in boiling water for approximately 45 seconds, then allow them to cool until they are manageable. The skin should easily come off with your fingers. Alternatively, if the peaches are ripe, a paring knife can aid in the peeling process.
**Exploring Flavor Variations**
Boost your fruit dishes by incorporating ¼ teaspoon of orange zest, ⅛ to ¼ teaspoon of almond extract, or 2 tablespoons of bourbon or amaretto into the filling. These enhancements can introduce depth and richness to the flavor profile. You can also replace fresh or frozen blackberries, strawberries, or raspberries for a different berry experience.
**Creative Topping Ideas**
Enhance your fruit dishes with an array of toppings. Vanilla ice cream, whipped cream, sweetened Greek yogurt, or crème fraîche are timeless selections. For a distinctive twist, experiment with infused alcoholic whipped cream, such as bourbon or amaretto whipped cream, which beautifully complements the fruit.
By mastering the effective use of frozen and canned fruits and experimenting with flavors and toppings, you can craft delightful dishes that are both convenient and scrumptious.
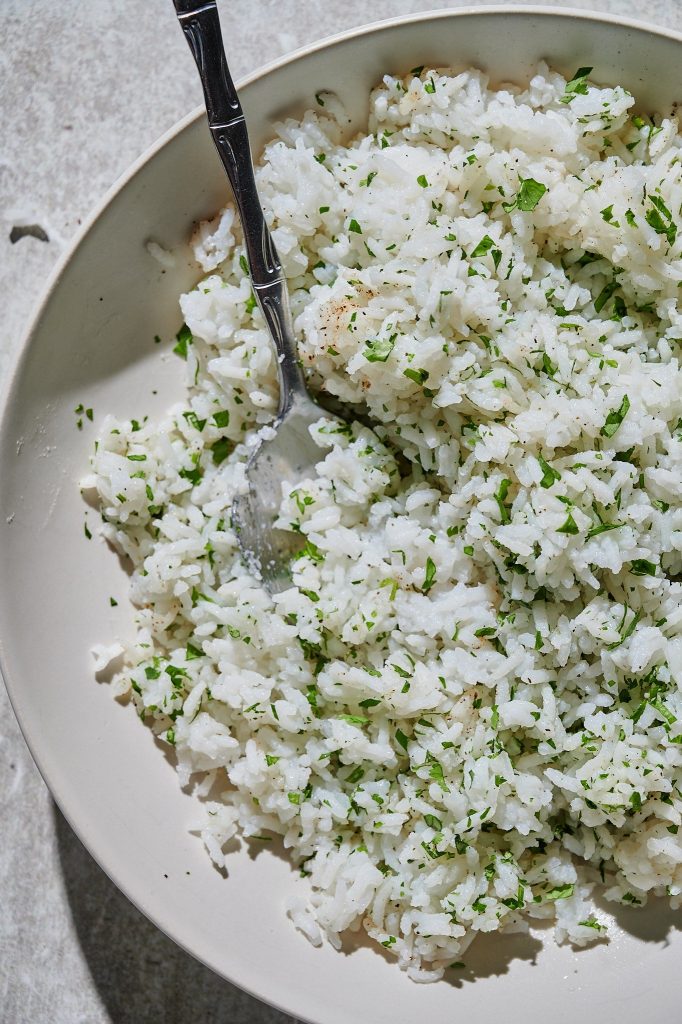
Tex Mex Rice Recipe: Simple Steps to Vibrant Taste
### About the Author: Holly Nilsson
Holly Nilsson is the innovative mind behind Spend With Pennies, a site committed to sharing simple and comforting recipes designed for everyday cooking. With a strong enthusiasm for nostalgic tastes and straightforward cooking methods, Holly seeks to empower busy home chefs to craft delightful meals that are both gratifying and feasible.
Her culinary path is captured in her book, “Everyday Comfort,” which acts as a wellspring of inspiration for those in search of hearty, home-cooked dishes. Through her user-friendly recipes, Holly encourages everyone to partake in the joy of cooking, no matter their experience level.
For additional insights and tasty recipes, you can delve deeper into Holly’s work through her articles on Spend With Pennies.
#### Follow Holly on Social Media:
– [Pinterest](https://www.pinterest.com/spendpennies/)
– [Facebook](https://www.facebook.com/ispendwithpennies/)
– [Twitter](http://spendpennies)
– [Instagram](https://www.instagram.com/spendpennies/)
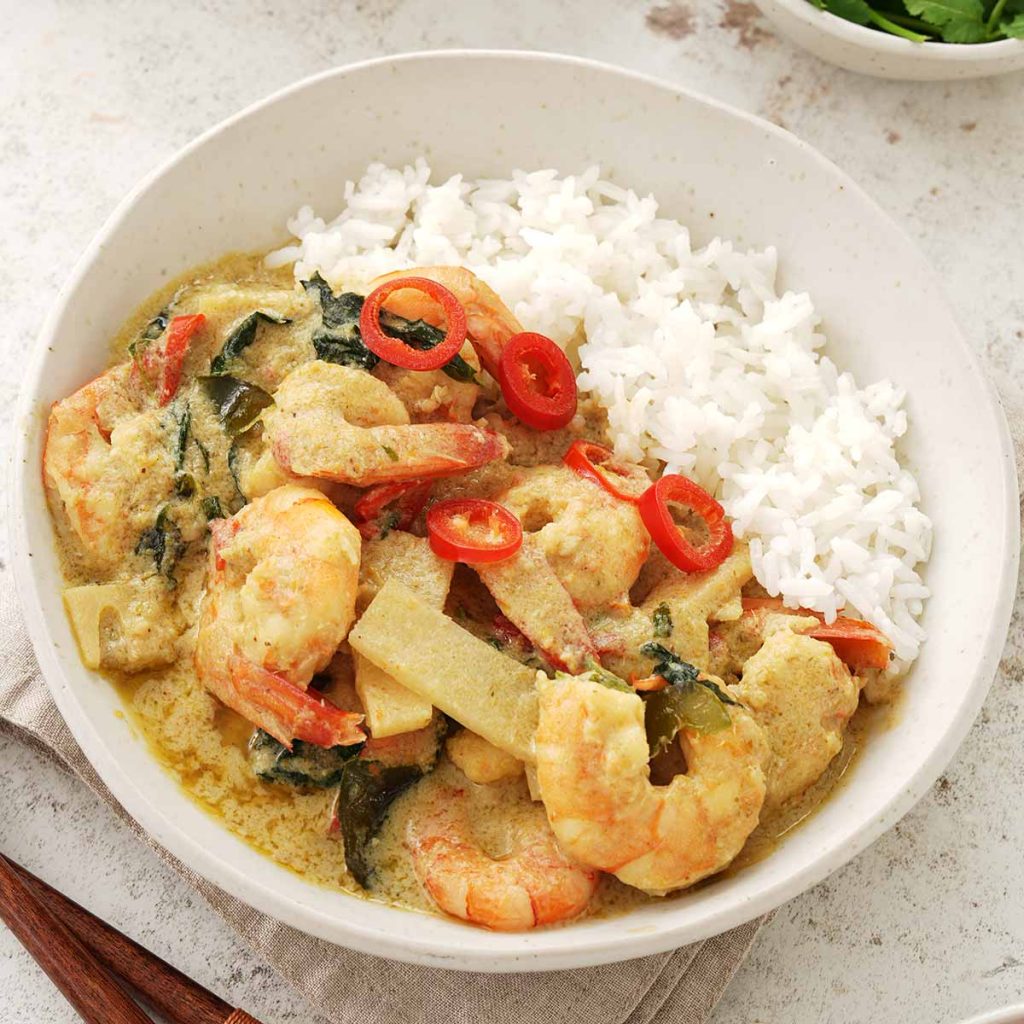
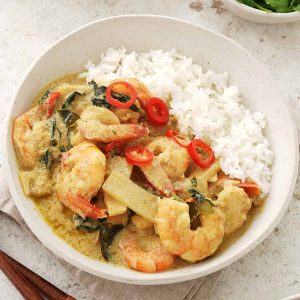
Thai Shrimp Curry Garnished with Crunchy Shallots
### Thai Shrimp Curry with Delicious Shallot Crisps
This shrimp curry is the dish of my fantasies! With amazing taste, just a handful of basic ingredients, and simple enough for a weeknight, it’s a meal that can swiftly become a regular in your kitchen.
#### Reasons I Adore This Recipe
One of the remarkable aspects of this shrimp curry is the inclusion of shallot crisps. These crunchy garnishes add a charming texture and flavor that enhances the dish. Fried shallots are a cherished topping in Southeast Asian cuisine, and by adding panko, you can achieve an even crunchier effect. This distinctive spin makes the curry not only delectable but also visually stunning.
When I serve this dish, I often pair the shrimp curry with rice, providing a customizable meal option. For children, I offer plain shrimp and steamed veggies, ensuring everyone has something they enjoy without changing the main components.
#### Ingredients
**For the Shrimp Curry:**
– Thai Kitchen red curry paste
– Coconut milk
– Shrimp
– Garlic
– Ginger
– Vegetables (like sweet red peppers and green beans)
**For the Shallot Crisps:**
– Shallots
– Panko breadcrumbs
– Fresh herbs (optional)
– Salt
#### Instructions
1. **Prepare Shallot Crisps (Optional):** Heat oil in a skillet over medium heat. Add sliced shallots and sauté until golden, around 5-10 minutes. Stir in panko and cook until the mixture is golden. Transfer to a bowl and mix with herbs and a pinch of salt.
2. **Begin the Curry:** Clean the skillet and set it back on medium heat. Add oil, curry paste, garlic, ginger, and vegetables. Cook for a few minutes, then pour in coconut milk and simmer until the sauce thickens and the vegetables are tender, about 5 minutes.
3. **Incorporate Shrimp:** Place shrimp on top of the curry. They will steam in the sauce. After 2-3 minutes, flip them to ensure even cooking. They are ready when they curl and turn opaque.
4. **Season:** Stir in fish sauce and brown sugar. Adjust seasoning to taste, adding more spice or salt if desired.
5. **Serve:** Ladle the curry over rice and top with shallot crisps for an added crunch.
#### Notes
– **Vegetable Alternatives:** Feel free to swap or add other vegetables like spinach or frozen mixed veggies, adjusting cooking times as necessary.
– **Flavor Boosts:** Consider adding lemongrass or lime for an extra flavor kick.
#### Conclusion
This Thai shrimp curry with shallot crisps is not merely a meal; it’s a culinary experience. The blend of creamy curry, tender shrimp, and crunchy toppings makes it a dish that is guaranteed to impress. Savor this delightful recipe that is ideal for any weeknight supper!

The New Jarred Pasta Sauce That Rivals the Sunday Sauce I Grew Up Eating (Itâs Better Than Raoâs!)
Itâs âthe best.â
READ MORE…

The Definitive Handbook for Creating Flawless Peach Crisp
Here’s an ideal recipe for peach crisp featuring fresh peaches, highlighted by a golden, crunchy crumble topping and a vanilla-infused filling! This traditional summer dessert recipe incorporates my advice for ripening and peeling peaches, along with make-ahead options, storage guidelines, and dietary alternatives.
Nothing compares to the delightful scent of a bubbling peach crisp in the oven, followed by snuggling up with a dish full of golden crumbles. I have a peach obsession, so as a cookbook author, I felt compelled to experiment when Alex and I found ourselves overwhelmed with juicy peaches from our local farmer’s market haul. This has become our favorite peach recipe: recently, we presented it to friends who returned for seconds—and even thirds!
I’ve tried this recipe countless times over the years, adjusting the sugar and perfecting the crumble-to-fruit ratio until I reached what I believe is peach crisp excellence! (Let me know if you concur.) The key is using flawlessly ripe peaches and ensuring that the filling is rich in both vanilla and lemon juice.
Ingredients for the ultimate peach crisp recipe
The most enjoyable aspect of preparing peach crisp? It’s quite forgiving. Unlike my mom’s fresh peach pie, there’s no tricky pastry crust to stress over. You simply mix, pour, sprinkle, and bake. I’ve found that even novice bakers can successfully make this recipe on their first attempt. Here are the ingredients you’ll require for a successful peach crisp recipe:
– Ripe fresh peaches – This is essential—don’t settle for under ripe. However, for this recipe, you can also use frozen or canned peaches if necessary.
– Granulated sugar – Just enough to highlight the natural sweetness.
– Cornstarch – My trick for avoiding a watery filling; use arrowroot starch as an alternative if needed.
– Lemon juice – Enhances the flavor (trust me! I’ve tested it without).
– Vanilla extract – The flavor booster that makes this crisp exceptional: peaches and vanilla create a perfect duo.
– Old-fashioned rolled oats – These provide the ideal texture.
– All-purpose flour – Or almond flour for a gluten-free option.
– Brown sugar – Introduces caramel undertones to the topping.
– Cinnamon – A classic complement to peaches.
– Cold butter – Vital for achieving that crispy texture.
My expert advice for ripening peaches
Throughout the years, I’ve perfected the technique of obtaining perfectly ripe peaches, even when they’re rock-hard in the store. There can be significant variability in ripeness when purchasing them: they might be incredibly firm or so juicy they’re nearly bruising. If they don’t yield when you gently squeeze them, they will need a few days to ripen. Here’s my method for ripening peaches:
I place the peaches in a paper bag alongside a banana. The banana emits ethylene gas, which aids in ripening the peaches uniformly over 1 to 4 days. I check them daily by gently pressing—when the flesh yields slightly under pressure, they’re ready for peach recipes.
Methods for peeling peaches
You can prepare peach crisp using skin-on peaches, but it does introduce an additional texture that some may not prefer. However, you shouldn’t attempt to peel peaches with a vegetable peeler: it damages the delicate fruit. Here’s my quick method for peeling peaches that I’ve learned from my mom in this peach pie recipe:
– Boil batches of peaches for 45 seconds each. Drop 3 peaches into a pot of boiling water, ensuring they’re fully submerged, and boil for 45 seconds.
– Transfer to ice water. Remove the peaches from the boiling water using a slotted spoon and place them in a bowl of ice water. Drop in the next batch and repeat.
– Remove the skin with your fingers. Once the peaches are cooled, use a sharp knife to poke the skin of the peach, then peel it off in large sections with your fingers.
Diet swaps I’ve tried
I’ve explored different dietary modifications to adapt this recipe for various needs:
– Gluten-Free: I replace all-purpose flour with almond flour. It creates an even crunchier topping that I sometimes prefer.
– Vegan: I utilize vegan butter or refined coconut oil as substitutes for regular butter. Vegan butter yields the crispiest results, while coconut oil produces a slightly softer (but still delectable) topping.
Storing leftovers
If you have a large dish of peach crisp and wish to save it, this dessert keeps well at room temperature, in the refrigerator, or frozen.
– It can remain uncovered at room temperature for 1 day. The topping retains its crispiness with this method.
– Refrigerate for up to 3 days. It holds up fairly well in the fridge and tastes even better when reheated.
– Freeze for up to 3 months. You can freeze peach crisp for as long as 3 months in a sealed container. Reheat in a 350-degree oven until bubbly and the topping is crisp.
Dietary notes
This peach crisp recipe is vegetarian. For gluten-free and
Read More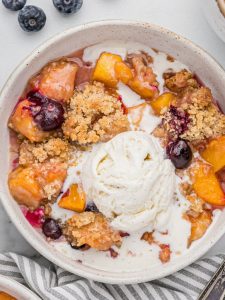
Peach and Blueberry Crisp Dessert Recipe
**Frozen and Canned Fruit: A Guide to Usage and Enhancements**
When seeking to savor fruit throughout the year, frozen and canned varieties offer a practical and adaptable option. Whether you’re preparing a dessert or a savory meal, these fruits can be just as tasty as their fresh counterparts, with a few tweaks.
**Using Frozen and Canned Peaches**
Frozen peaches are an excellent selection for recipes, as they do not need defrosting prior to use. However, they may occasionally be more tart than fresh peaches. To counter this, think about adding ½ cup of sugar to your filling. For canned peaches, choose those without added sugar, or include ¼ cup of sugar in the filling to reach the desired sweetness.
**Incorporating Frozen Blueberries**
Frozen blueberries are just as simple to use, needing no thawing. They can be a rapid and delightful enhancement to any recipe, preserving their taste and consistency.
**Efficient Peeling Techniques for Peaches**
Removing the skin from peaches can be effortless with the proper method. Immerse them in boiling water for approximately 45 seconds, then allow them to cool until they are manageable. The skin should easily come off with your fingers. Alternatively, if the peaches are ripe, a paring knife can aid in the peeling process.
**Exploring Flavor Variations**
Boost your fruit dishes by incorporating ¼ teaspoon of orange zest, ⅛ to ¼ teaspoon of almond extract, or 2 tablespoons of bourbon or amaretto into the filling. These enhancements can introduce depth and richness to the flavor profile. You can also replace fresh or frozen blackberries, strawberries, or raspberries for a different berry experience.
**Creative Topping Ideas**
Enhance your fruit dishes with an array of toppings. Vanilla ice cream, whipped cream, sweetened Greek yogurt, or crème fraîche are timeless selections. For a distinctive twist, experiment with infused alcoholic whipped cream, such as bourbon or amaretto whipped cream, which beautifully complements the fruit.
By mastering the effective use of frozen and canned fruits and experimenting with flavors and toppings, you can craft delightful dishes that are both convenient and scrumptious.
Read More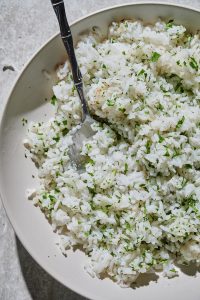
Tex Mex Rice Recipe: Simple Steps to Vibrant Taste
### About the Author: Holly Nilsson
Holly Nilsson is the innovative mind behind Spend With Pennies, a site committed to sharing simple and comforting recipes designed for everyday cooking. With a strong enthusiasm for nostalgic tastes and straightforward cooking methods, Holly seeks to empower busy home chefs to craft delightful meals that are both gratifying and feasible.
Her culinary path is captured in her book, “Everyday Comfort,” which acts as a wellspring of inspiration for those in search of hearty, home-cooked dishes. Through her user-friendly recipes, Holly encourages everyone to partake in the joy of cooking, no matter their experience level.
For additional insights and tasty recipes, you can delve deeper into Holly’s work through her articles on Spend With Pennies.
#### Follow Holly on Social Media:
– [Pinterest](https://www.pinterest.com/spendpennies/)
– [Facebook](https://www.facebook.com/ispendwithpennies/)
– [Twitter](http://spendpennies)
– [Instagram](https://www.instagram.com/spendpennies/)
Thai Shrimp Curry Garnished with Crunchy Shallots
### Thai Shrimp Curry with Delicious Shallot Crisps
This shrimp curry is the dish of my fantasies! With amazing taste, just a handful of basic ingredients, and simple enough for a weeknight, it’s a meal that can swiftly become a regular in your kitchen.
#### Reasons I Adore This Recipe
One of the remarkable aspects of this shrimp curry is the inclusion of shallot crisps. These crunchy garnishes add a charming texture and flavor that enhances the dish. Fried shallots are a cherished topping in Southeast Asian cuisine, and by adding panko, you can achieve an even crunchier effect. This distinctive spin makes the curry not only delectable but also visually stunning.
When I serve this dish, I often pair the shrimp curry with rice, providing a customizable meal option. For children, I offer plain shrimp and steamed veggies, ensuring everyone has something they enjoy without changing the main components.
#### Ingredients
**For the Shrimp Curry:**
– Thai Kitchen red curry paste
– Coconut milk
– Shrimp
– Garlic
– Ginger
– Vegetables (like sweet red peppers and green beans)
**For the Shallot Crisps:**
– Shallots
– Panko breadcrumbs
– Fresh herbs (optional)
– Salt
#### Instructions
1. **Prepare Shallot Crisps (Optional):** Heat oil in a skillet over medium heat. Add sliced shallots and sauté until golden, around 5-10 minutes. Stir in panko and cook until the mixture is golden. Transfer to a bowl and mix with herbs and a pinch of salt.
2. **Begin the Curry:** Clean the skillet and set it back on medium heat. Add oil, curry paste, garlic, ginger, and vegetables. Cook for a few minutes, then pour in coconut milk and simmer until the sauce thickens and the vegetables are tender, about 5 minutes.
3. **Incorporate Shrimp:** Place shrimp on top of the curry. They will steam in the sauce. After 2-3 minutes, flip them to ensure even cooking. They are ready when they curl and turn opaque.
4. **Season:** Stir in fish sauce and brown sugar. Adjust seasoning to taste, adding more spice or salt if desired.
5. **Serve:** Ladle the curry over rice and top with shallot crisps for an added crunch.
#### Notes
– **Vegetable Alternatives:** Feel free to swap or add other vegetables like spinach or frozen mixed veggies, adjusting cooking times as necessary.
– **Flavor Boosts:** Consider adding lemongrass or lime for an extra flavor kick.
#### Conclusion
This Thai shrimp curry with shallot crisps is not merely a meal; it’s a culinary experience. The blend of creamy curry, tender shrimp, and crunchy toppings makes it a dish that is guaranteed to impress. Savor this delightful recipe that is ideal for any weeknight supper!
Read More
Uncover the Ideal Summer Accompaniment: Mexican Street Corn (Elote)
**Uncover the Ideal Summer Accompaniment: Mexican Street Corn (Elote)**
As the sun beams brighter and the days extend longer, summer beckons us to savor lively flavors and outdoor festivities. Among the numerous pleasures of this season, Mexican Street Corn, or Elote, shines as a classic summer side dish that embodies the spirit of Mexican street cuisine. With its captivating blend of smoky, creamy, and tangy tastes, Elote serves as the ultimate enhancement to any summer meal.
**A Slice of Heritage**
Elote is a cherished street food in Mexico, frequently offered by vendors from carts or stands. This dish features grilled corn on the cob, lavishly coated with a blend of mayonnaise, crema (a variety of Mexican sour cream), and crumbled cotija cheese. It’s then adorned with chili powder, lime juice, and cilantro, creating a medley of flavors that dance across the palate. This authentic preparation exemplifies the simplicity and richness of Mexican gastronomy, where fresh ingredients are transformed into delectable creations.
**The Skill of Grilling**
The secret to exceptional Elote resides in the grilling technique. Grilling the corn amplifies its inherent sweetness and infuses a smoky essence that underpins the dish. The corn is usually grilled until the kernels are slightly charred, contributing depth and complexity to each morsel. This approach not only heightens the flavor but also provides the corn with a satisfying texture that contrasts wonderfully with the creamy toppings.
**A Multifaceted Treat**
While the traditional rendition of Elote is a favorite among many, its flexibility allows for countless variations to cater to diverse palates. For those seeking a spicier twist, extra chili powder or hot sauce can be introduced. Some variations incorporate a dash of smoked paprika or cayenne pepper for an added layer of flavor. For a healthier option, Greek yogurt can replace mayonnaise, providing a lighter yet equally scrumptious choice.
**Ideal Pairings**
Elote is a flexible side dish that beautifully complements a variety of summer meals. It enhances grilled proteins, such as chicken, steak, or fish, imparting a burst of flavor that elevates the entire dining experience. It can also accompany tacos, enchiladas, or quesadillas, enriching the overall meal with its flavorful and tangy profile. To provide a refreshing contrast, serve Elote with a crisp, chilled beverage like a margarita or a Mexican lager.
**Bringing Elote to Your Dining Table**
Creating Elote at home is a straightforward and gratifying task. Begin by selecting fresh corn on the cob, ideally with the husks still attached. Soak the corn in water for around 15 minutes to avert burning, then grill over medium heat until the kernels are soft and slightly charred. Once off the grill, spread the corn with a mixture of mayonnaise and crema, then coat it in crumbled cotija cheese. Complete with a dusting of chili powder, a squeeze of lime juice, and a sprinkle of chopped cilantro.
**Final Thoughts**
Mexican Street Corn, or Elote, transcends being merely a side dish; it celebrates summer flavors and showcases the rich culinary tradition of Mexico. Its fusion of smoky, creamy, and tangy aspects makes it an irresistible addition to any summer gathering. Whether relished at a backyard cookout or a lively picnic, Elote is sure to enchant the senses and leave a lasting impact on all who enjoy its deliciousness. So, ignite the grill and unearth the perfect summer companion with this iconic Mexican delight.
Read More
Salad featuring Chicken, Bacon, and Ranch Dressing
**Chicken Bacon Ranch Salad: A Timeless Flavor Pairing**
Chicken, bacon, and ranch dressing form a trio that has gained popularity as a cherished flavor pair for many. This timeless blend is not only flavorful but also adaptable, making it an ideal selection for a filling and fulfilling salad.
**Ingredients and Preparation**
The base of this salad is chicken, which can be cooked in a variety of methods. For an added kick of flavor, think about using ranch grilled chicken. This involves marinating chicken breasts in ranch seasoning prior to grilling them to perfection. Nonetheless, any cooked and sliced or shredded chicken is just as effective.
The salad itself features a combination of fresh ingredients: crisp lettuce, ripe tomatoes, crunchy cucumbers, smooth avocado, crispy bacon, and zesty onions. These elements come together to forge a well-rounded and tasty dish.
**The Highlight: Ranch Dressing**
The centerpiece of the Chicken Bacon Ranch Salad is undoubtedly the ranch dressing. A homemade ranch dressing, prepared with fresh herbs, can enhance the salad remarkably. However, if you’re short on time, a high-quality store-bought ranch dressing will suffice.
**Conclusion**
Whether you are seeking a quick lunch or a light dinner, the Chicken Bacon Ranch Salad is a delightful option. Its mixture of textures and flavors results in a satisfying meal that can be enjoyed at any time of the year.
Read More
Weekly Menu Schedule for the Week of June 30, 2025
### About the Author: Holly Nilsson
Holly Nilsson serves as the imaginative mind behind Spend With Pennies, a space devoted to offering simple and comforting recipes tailored for real-world cooking. With a strong enthusiasm for nostalgic flavors and uncomplicated cooking methods, Holly enables busy home chefs to whip up tasty meals that are both gratifying and easy to make.
Her culinary path is characterized by a dedication to making cooking enjoyable and free from stress. Holly’s recipes frequently take cues from classic comfort foods, reinvented to suit the fast-paced lives of contemporary families. By emphasizing uncomplicated techniques and familiar flavors, she guarantees that anyone can produce hearty, home-cooked dishes without difficulty.
Alongside her contributions to Spend With Pennies, Holly has penned “Everyday Comfort,” a cookbook that aims to motivate readers with additional recipes that honor the warmth and joy found in home cooking. This book embodies her belief in uniting people through food, making it an ideal addition to any culinary collection.
For those keen on tracking Holly’s culinary journeys, she remains active on various social media outlets. You can reach out to her on:
– [Pinterest](https://www.pinterest.com/spendpennies/)
– [Facebook](https://www.facebook.com/ispendwithpennies/)
– [Twitter](http://spendpennies)
– [Instagram](https://www.instagram.com/spendpennies/)
Through her captivating content and accessible recipes, Holly Nilsson continues to motivate home cooks to prepare dishes that are not only delightful but also infused with love and nostalgia.
Read More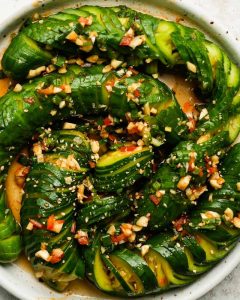
Cucumber Crunch Salad with Tofu
### Cucumber Crunch Salad with Tofu: A Revitalizing Meal for a Heat Wave
With rising temperatures, the idea of cooking can seem daunting. The urge to refrain from using the stove or even the microwave prompts many to look for invigorating, no-cook dishes. One such delight that excels during the summer heat is the Cucumber Crunch Salad with Tofu. This salad brings together fresh cucumbers, creamy tofu, and a tasty peanut sesame dressing, making it an ideal selection for warm days.
#### The Origin of the Salad
This salad is inspired by the cherished Peanut Sesame Noodles, a dish that has been a favorite for many years. The dressing, which is the essence of this salad, is a straightforward yet delectable mix of ingredients that can enhance any raw vegetable. While cucumbers take center stage here, feel free to try other veggies like grated carrots or shredded cabbage.
#### Essential Ingredients
**Dressing:**
– 4 tablespoons smooth peanut butter
– 2 tablespoons soy sauce
– 1 tablespoon unseasoned rice vinegar
– 1 ½ teaspoons honey or brown sugar
– ½-inch piece of fresh ginger, peeled and minced or finely grated
– 1 small garlic clove, minced or finely grated
– 2 teaspoons toasted sesame oil
– Hot sauce, chili paste, or chili crisp to taste
– Water, if necessary
**Salad Construction:**
– 1 package (14 to 16 ounces) Persian cucumbers (5 to 6)
– 1 scallion
– 3 tablespoons salted roasted peanuts, chopped finely
– 1 package firm or extra-firm silken tofu (10 to 12 ounces)
– Toasted black and white sesame seeds (optional)
#### Steps for Preparation
1. **Prepare the Dressing:**
In a large bowl, whisk all dressing ingredients together. Taste and modify the seasoning as required. Set aside a portion of the dressing to pour over the assembled salad later.
2. **Get the Vegetables and Tofu Ready:**
– Slice the cucumbers in half lengthwise, then cut each half into long wedges, followed by 1 ½-inch pieces.
– Chop the scallion and peanuts finely.
– Take the tofu out of its package, pat it dry, and slice it into batons.
3. **Construct the Salad:**
– On a serving dish, place half of the tofu and drizzle with half of the reserved dressing.
– Mix the cucumbers with the dressing and pile half on top of the tofu.
– Repeat the process with the remaining tofu, dressing, and cucumbers.
– Sprinkle with the scallion-peanut mixture and, if desired, drizzle with chili crisp or hot sauce and add a sprinkle of sesame seeds.
#### Suggestions for Serving
This salad tastes best when enjoyed right away to keep the cucumbers crisp. If allowed to sit too long, the salt in the dressing can draw moisture from the cucumbers, causing them to become soggy. For optimal results, serve it fresh and think about preparing only what you can consume in one sitting.
#### Final Thoughts
The Cucumber Crunch Salad with Tofu is not just a delightful way to stay cool but also a flexible dish that can be tailored to your preferences. Whether you are a cucumber fan or simply in search of a light meal, this salad is destined to be a favorite recipe during those hot summer days. Relish the refreshing flavors and the simplicity of preparation, and you may find yourself making it throughout the summer.
Read More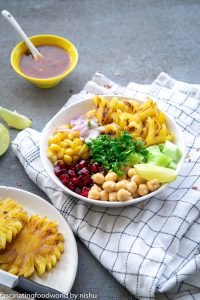
Speedy and Delicious Mexican Corn Salad Recipe
# Mexican Corn Salad Recipe
This Mexican corn salad includes charred corn kernels, tomatoes, onions, jalapenos, and a sprinkle of cotija cheese in a creamy, tangy dressing. The mix of flavors and textures makes it a charming addition to any meal or event.
## Flavor Profile
The charred corn enhances its natural sweetness, creating a perfect harmony with the zesty vegetables and rich dressing. This salad is not only delicious but also visually enticing, showcasing bright colors from the fresh ingredients.
## Skill Level
This is a simple recipe that is perfect for novice grillers! The steps are easy to follow: grill the corn, mix with vegetables, and drizzle with dressing.
## Preparation Tips
– **Make Ahead**: Prepare the dressing beforehand to make sure it is extra cold when added to the salad.
– **Budget Tip**: To expand the salad, think about adding cooked orzo or any small pasta.
## Ingredient Tips for Mexican Corn Salad
– **Corn**: Opt for fresh or frozen (thawed) corn. If a grill isn’t available, you can roast frozen or canned kernels under the broiler with a dash of oil until charred.
– **Vegetables**: Tomatoes, red onions, and jalapenos contribute color, crunch, and juicy flavor.
– **Cheese**: Cotija cheese provides an authentic flavor. If it’s not available, you can replace it with crumbled feta, gorgonzola, or shredded mozzarella.
– **Dressing**: For the richest flavor, use full-fat mayonnaise and sour cream. Plain Greek yogurt can serve as a substitute for mayonnaise. Boost the dressing with homemade adobo seasoning for extra taste.
– **Variations**: This salad is adaptable! Feel free to include diced avocados, black beans, sliced black olives, or diced cucumbers for added color and crunch.
## Storing Mexican Corn Salad
Store any leftovers in a covered container in the refrigerator for up to 4 days. Before serving, mix the salad and incorporate a splash of fresh lime juice or cilantro to rejuvenate the flavors. Due to the varying textures, freezing is not advisable.
Leftovers can be innovatively transformed into a fresh grilled chicken salad or used as a filling for homemade pita bread for a light and tasty workday lunch.
## Recipe Overview
### Mexican Corn Salad
– **Prep Time**: 15 minutes
– **Cook Time**: 7 minutes
– **Chill Time**: 1 hour
– **Total Time**: 1 hour 22 minutes
– **Servings**: 8
### Ingredients
– Char-grilled corn
– Tomatoes
– Red onions
– Jalapenos
– Cotija cheese
– Creamy dressing (mayonnaise, sour cream, adobo seasoning)
### Instructions
1. Mix all dressing ingredients and set aside.
2. Preheat grill to medium-high. Coat corn cobs with olive oil and grill for 7-10 minutes, turning occasionally until slightly charred. Allow to cool completely.
3. Cut corn kernels off the cob and place in a bowl.
4. Add remaining ingredients except lime and mix. Drizzle dressing and toss to combine.
5. Chill for at least 1 hour before serving. Garnish with additional cheese, cilantro, and lime wedges if desired.
### Nutrition Information (per serving)
– **Calories**: 128
– **Carbohydrates**: 4g
– **Protein**: 2g
– **Fat**: 12g
– **Saturated Fat**: 3g
– **Cholesterol**: 15mg
– **Sodium**: 139mg
– **Potassium**: 99mg
– **Fiber**: 1g
– **Sugar**: 2g
This Mexican corn salad is a refreshing and tasty dish that is sure to delight at any gathering. Savor the vivid flavors and the joy of creating a delectable salad that embodies the spirit of Mexican cuisine.
Read More